
Manage Outlook Autocomplete
This article contains an overview of the Microsoft Outlook AutoComplete list (also known as the Outlook Auto-Complete list). In addition to describing the feature, this article contains more information and step-by-step instructions for advanced users to manage the list.
Outlook maintains the AutoComplete list. The list is used by both the automatic name-checking feature and the automatic completion feature. The AutoComplete list, also known as the nickname cache, is generated automatically when you send email messages from Outlook. The list contains SMTP addresses, LegacyExchangeDN entries, and display names for people to whom you have sent mail previously.
Note The AutoComplete list for Outlook is specific to Outlook and is not shared by Outlook Web App (OWA). OWA maintains its own AutoComplete list.
The following sections provide information about the AutoComplete feature.
Limit to the number of entries
Outlook limits the number of entries that you can save in the AutoComplete list. After you reach this limit, Outlook uses an internal algorithm to determine the best names to remove from the list. It does this based on a usage weighting. Therefore, you may find some names unexpectedly removed from your nickname cache. There are two general approaches that you can use to avoid this situation:
- You can proactively remove AutoComplete list entries that you no longer need. This is the preferred approach. For more information about how to do this, see the section titled “How to remove AutoComplete list entries one at a time.”
- You can increase the limit for the nickname cache. Because this configuration is untested, we do not recommend it. If you have a larger nickname cache, you could also lose a larger number of cached entries if your nickname cache becomes unusable because of corruption. For more information about how to increase the limit, see the section titled “How to change the limit for the AutoComplete list.”
The limits are as follows:
- Outlook 2016: 1,000 entries
- Outlook 2013: 1,000 entries
- Outlook 2010: 1,000 entries
- Outlook 2007: 2,000 entries
- Outlook 2003: 1,000 entries
How to enable the AutoComplete feature
This section details how to enable or disable the AutoComplete feature.
Outlook 2010, Outlook 2013, and Outlook 2016
To access the AutoComplete setting, follow these steps:
- On the File menu, click Options.
- Select the Mail tab.
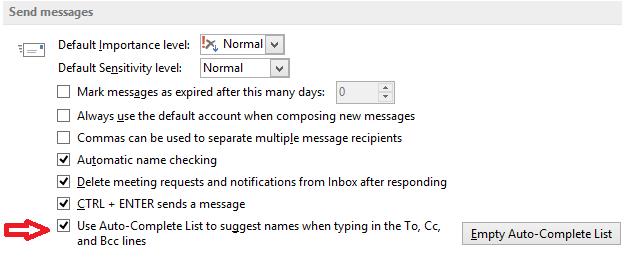
- Scroll approximately halfway down until you see Send messages. Make sure that the Use Auto-Complete List to suggest names when typing in the To, Cc, and Bcc lines box is checked.

Outlook 2003 and Outlook 2007
To access the AutoComplete settings, follow the steps:
- Click Tools, and then click Options.
- Click the E-mail options button.
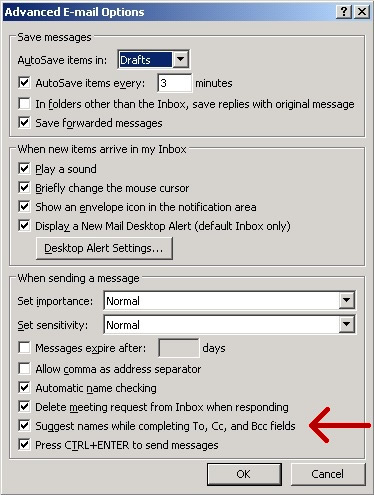
- Click the Advanced E-mail Options button.
- Make sure that the Suggest names while completing To, Cc, and Bcc fields box is checked. (The screen shot for this step follows.)

How to import .nk2 files into Outlook 2010, Outlook 2013, and Outlook 2016
Microsoft Office Outlook 2007 and earlier versions store the AutoComplete list in an nickname (.nk2) file on the disk. Outlook 2010, Outlook 2013, and Outlook 2016 store the AutoComplete list as a hidden message in your primary message store. Outlook 2010, Outlook 2013, and Outlook 2016 let you import the older .nk2 files.
For more information about how to import .nk2 files in Outlook 2010, go to the following Microsoft website:
How to copy the AutoComplete list
The steps to export and import the AutoComplete list are different, depending on the version of Outlook that you are using.
Outlook 2010, Outlook 2013, and Outlook 2016
To copy the AutoComplete list in Outlook 2010, Outlook 2013, and Outlook 2016, follow these steps:
Step 1
To export the AutoComplete mailbox message, follow these steps:
- Exit Outlook, and then close Outlook Web Access or Outlook Web App (OWA) on all workstations that are connected to your mailbox.
- Download and install MFCMAPI from http://mfcmapi.codeplex.com.
- Run mfcmapi.exe.
- On the Session menu, click Logon.
- If you are prompted for a profile, select the desired profile name, and then click OK.
- In the top pane, locate the line that corresponds to your mailbox, and then double-click it.
- In the left-side navigation pane, expand Root Container, and then expand Top of Information Store or IPM_SUBTREE.
- Right-click the Inbox folder, and then click Open Associated Content Table. This action opens a new MFCMAPI window that contains various properties.
- Under the Subject column, right-click the item that has the subject IPM.Configuration.Autocomplete, and then click Export Message. This action opens the Save Message To File window.
- In the drop-down list, select MSG file (UNICODE), and then click OK.
- Select a folder location to which you want to save the message, and then click Save. Note this location.
Step 2
To import the AutoComplete mailbox message, follow these steps.
- Exit Outlook, and then close Outlook Web Access or Outlook Web App (OWA) on all workstations that are connected to your mailbox.
- Download and install MFCMAPI from http://mfcmapi.codeplex.com
- Run mfcmapi.exe.
- On the Session menu, click Logon.
- If you are prompted for a profile, select the desired profile name, and then click OK.
- In the top pane, locate the line that corresponds to your mailbox, and then double-click it.
- In the left-side navigation pane, expand Root – Mailbox, and then expand Top of Information Store or IPM_SUBTREE.
- Right-click the Inbox folder, and then click Open Associated Content Table. This action opens a new MFCMAPI window that contains various properties.
- To avoid duplicate entries, you must delete the existing AutoComplete message.
Note Before you delete the IPM.Configuration.Autocomplete message, you must export the message by using the steps in the “How to export the Auto-Complete cache” section.
To delete the existing AutoComplete message, follow these steps:
- In the Subject column, locate the item that has the subject IPM.Configuration.Autocomplete.
- Right-click the item, and then click Delete message. This opens the Delete Item window.
- In the drop-down list, select Permanent deletion (deletes to deleted item retention if supported), and then click OK.
- On the Folder menu, click Import, and then click From MSG.
- Locate the .msg file that you created in step 11 of the “How to Export the Auto-Complete List” section, and then click OK.
- In the Load MSG window that appears, select Load message into current folder in the Load style list, and then click OK.
The AutoComplete information is imported from the IPM.Configuration.Autocomplete_<hexadecimal code>.msg, where the placeholder<hexadecimal code> represents a long string of numbers and letters.
Outlook 2003 and Outlook 2007
The steps to copy the AutoComplete list in Outlook 2003 and Outlook 2007 are different. This is because Outlook 2003 and Outlook 2007 store the AutoComplete list in the .nk2 file.
To copy the AutoComplete list in Outlook 2007, go to the following Microsoft website:
Copy the AutoComplete list to another computer
How to remove AutoComplete list entries one at a time
To remove entries from the AutoComplete cache one entry at a time, follow these steps:
- Open a new email message.
- Type the first few characters of the AutoComplete entry that you want to remove.
- When the entry appears in the list of suggested names, move your mouse pointer over the name until it becomes highlighted, but do not click the name.
- When the “X” icon appears next to the highlighted name, click X to remove the name from the list, or press the Delete key on the keyboard.
How to clear the whole AutoComplete list
This section explains how to delete the AutoComplete list.
Outlook 2010, Outlook 2013, and Outlook 2016
Use one of the following two methods to delete the AutoComplete list in Outlook 2010, Outlook 2013, and Outlook 2016.
Method 1
- Open Outlook.
- On the File tab, click Options.
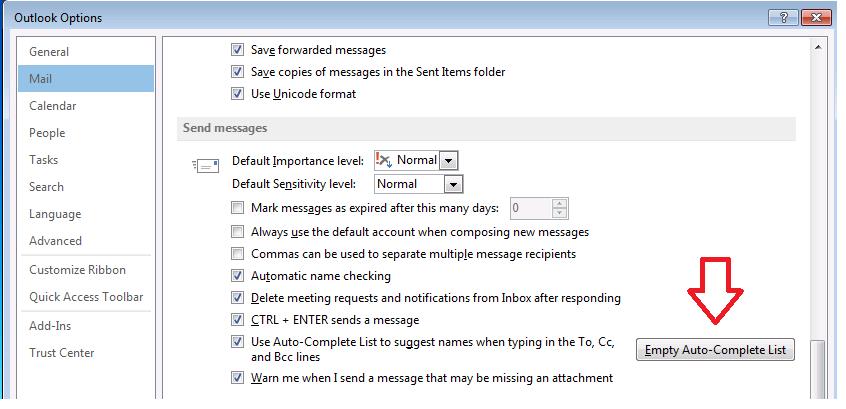
- Click the Mail tab.
- Under Send Messages, click Empty Auto-Complete List.

- Click Yes.
Method 2
Start Outlook by using the /CleanAutoCompleteCache switch. To do this, follow these steps:
- Click Start, and then click Run.
- Type Outlook.exe /CleanAutoCompleteCache.
Note If Outlook is not installed in the default location, you must point to the path of Outlook.exe.
Outlook 2003 and Outlook 2007
To delete the AutoComplete list in Outlook 2003 and Outlook 2007, you must manually delete the .nk2 file. To delete the .nk2 file, follow these steps:
- Exit Outlook.
- Click Start, and then click Computer.
- Click Organize, and then click Folder and search options.
- On the View tab, click Show hidden files, folders, and drives.
- Click OK.
- Click Start, click All Programs, click Accessories, and then click Run.
- In the Run dialog box, type the following command (including the quotation marks), and then click OK:
“C:\ Users\UserName\AppData\Roaming\Microsoft\Outlook”NoteUsername in this path is the name of the currently logged on Windows user.
- Right-click the .NK2 file that has name of the profile that you want to reset, and then click Rename.
- Rename the file as profilename.bak, and then press Enter.
- tart Outlook.
Issues with the AutoComplete cache
This section describes known issues that can occur with the AutoComplete cache. The AutoComplete cache can become corrupted over time and may not save new entries. If this happens, you can try to remove individual entries from the list. To do this, see the section titled “How to remove AutoComplete list entries one at a time.” If that does not resolve the issue, the whole AutoComplete list can be reset. To do this, see the section titled “How to clear the whole AutoComplete list.”
How to change the limit for the AutoComplete list
Because this configuration is untested, we do not recommend it. If you have a larger AutoComplete list, you could also lose a larger number of cached entries if your AutoComplete cache becomes unusable because of corruption. Given this disclaimer, you can use the following registry data to increase the AutoComplete list limit in Outlook.
Important This section, method, or task contains steps that tell you how to modify the registry. However, serious problems might occur if you modify the registry incorrectly. Therefore, make sure that you follow these steps carefully. For added protection, back up the registry before you modify it. Then, you can restore the registry if a problem occurs. For more information about how to back up and restore the registry, click the following article number to view the article in the Microsoft Knowledge Base:
- Exit Outlook.
- Start Registry Editor.
- In Windows 8.x, press the Windows key, type regedit and then press Enter.
- In Windows 7 and Windows Vista, click Start, type regedit in the Start Search box, and then press Enter.
- Locate and then select the following registry subkey:
HKEY_CURRENT_USER\Software\Microsoft\Office\x.0\Outlook\AutoNameCheck
Note The placeholder x.0 in this registry subkey represents your version of Microsoft Office. Use the appropriate value from the following list.
Outlook 2016 = 16.0
Outlook 2013 = 15.0
Outlook 2010 = 14.0
Outlook 2007 = 12.0
Outlook 2003 = 11.0 - On the Edit menu, point to New, and then click DWORD value.
- Type MaxNickNames, and then press Enter.
- On the Edit menu, click Modify.
- Type the new value for the limit, and then click OK.
Notes
- Make sure that you type the number in decimal form. That is the correct form in which to type the number.
- Try increasing the limit by only a marginal amount to test the new limit. For example, to create a 20 percent increase in the limit in Outlook 2013, you would specify 1200 for the MaxNickNames value.
- Exit Registry Editor.
- Start Outlook.
Note The MaxNickNames registry value merely specifies the nondefault limit. Therefore, you can also use this value to lower the limit of the nickname cache.